Yao L

探索永无止境

  • 主页
所有文章 推荐 关于我

Yao L

探索永无止境

  • 主页

Centos7.6集群实现OPENLDAP认证

2021-01-30

1 Centos7.6集群实现OPENLDAP认证

1.1 LDAP简介

LDAP 全称轻量级目录访问协议(英文:Lightweight Directory Access Protocol),是一个运行在 TCP/IP 上的目录访问协议。目录是一个特殊的数据库,它的数据经常被查询,但是不经常更新。其专门针对读取、浏览和搜索操作进行了特定的优化。目录一般用来包含描述性的,基于属性的信息并支持精细复杂的过滤能力。比如 DNS 协议便是一种最被广泛使用的目录服务。

LDAP 中的信息按照目录信息树结构组织,树中的一个节点称之为条目(Entry),条目包含了该节点的属性及属性值。条目都可以通过识别名dn来全局的唯一确定,可以类比于关系型数据库中的主键。比如dn为uid=test,ou=People,dc=sugon,dc=com的条目表示在组织中一个名字叫做test的员工,其中uid=test也被称作相对区别名rdn。

一个条目的属性通过LDAP元数据模型(Scheme)中的对象类(objectClass)所定义,下面的表格列举了对象类inetOrgPerson(Internet Organizational Person)中的一些必填属性和可选属性。

属性名 是否必填 描述
cn 是 该条目被人所熟知的通用名(Common Name)
sn 是 该条目的姓氏
o 否 该条目所属的组织名(Organization Name)
mobile 否 该条目的手机号码
description 否 该条目的描述信息

下面是一个典型的LDAP目录树结构,其中每个节点表示一个条目。在下一节中我们将按照这个结构来配置一个简单的LDAP 服务。

1.2 LDAP服务端安装配置

1.2.1 安装phpldapadmin
1
2
3
4
5
6
7
8
9
10
11
12
13
14
15
16
17
18
19
20
21
22
23
24
25
26
27
28
29
30
31
32
33
34
35
36
37
38
39
40
41
42
43
44
45
yum -y install httpd php php-ldap php-gd php-mbstring php-pear php-bcmath php-xml

yum -y install epel-release

yum --enablerepo=epel -y install phpldapadmin

l 配置phpldapadmin

vim /etc/httpd/conf.d/phpldapadmin.conf

\# Web-based tool for managing LDAP servers

Alias /phpldapadmin /usr/share/phpldapadmin/htdocs

Alias /ldapadmin /usr/share/phpldapadmin/htdocs

<Directory /usr/share/phpldapadmin/htdocs>

<IfModule mod_authz_core.c>

\# Apache 2.4

Require local

Require all granted

</IfModule>

<IfModule !mod_authz_core.c>

\# Apache 2.2

Order Deny,Allow

Allow from all

\#Deny from all

\#Allow from 127.0.0.1

\#Allow from ::1

</IfModule>

</Directory>
  • 重启http服务器
1
2
3
systemctl enable httpd.service

systemctl restart httpd.service
1
sed -i "s#^\$servers->setValue('login','attr','uid');#//\$servers->setValue('login','attr','uid');#g" /etc/phpldapadmin/config.php
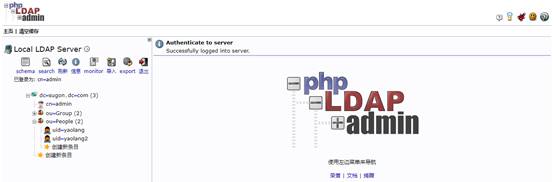
  • 通过浏览器登录http://10.0.50.100/ldapadmin

phpldapadmin

1.2.2 安装配置openldap
  • 关闭防火墙,关闭selinux
1
sed -i '/SELINUX/s/enforcing/disabled/' /etc/selinux/config && setenforce 0&& systemctl disable firewalld.service && systemctl stop firewalld.service
  • 安装openladp服务
1
yum -y install openldap compat-openldap openldap-clients openldap-servers openldap-servers-sql openldap-devel migrationtools
  • 设置日志文件
1
2
3
4
5
6
7
8
9
mkdir /var/log/slapd

chmod 755 /var/log/slapd/

chown ldap:ldap /var/log/slapd/

vim /etc/rsyslog.conf

local4.* /var/log/slapd/slapd.log ##添加一行
  • 配置安装文件
1
2
3
4
5
cp /usr/share/openldap-servers/DB_CONFIG.example /var/lib/ldap/DB_CONFIG

chown -R ldap:ldap /var/lib/ldap /etc/openldap

chmod -R 700 /var/lib/ldap
  • 启动ldap
1
2
3
systemctl start slapd

systemctl enable slapd
  • 导入基本的模板
1
ls /etc/openldap/schema/*.ldif | while read f; do ldapadd -Y EXTERNAL -H ldapi:/// -f $f; done
  • 导入成功日志文件
1
2
3
4
5
6
7
8
9
10
11
12
13
14
15
16
17
18
19
20
21
22
23
24
25
26
27
28
29
30
31
32
33
34
35
36
37
38
39
40
41
42
43
44
45
46
47
48
49
50
51
52
53
54
55
56
57
58
59
60
61
62
63
64
65
66
67
68
69
70
71
72
73
74
75
76
77
78
79
80
81
82
83
84
85
86
87
88
89
90
91
92
93
94
95
96
97
98
99
100
101
102
103
104
105
106
107
SASL/EXTERNAL authentication started

SASL username: gidNumber=0+uidNumber=0,cn=peercred,cn=external,cn=auth

SASL SSF: 0

adding new entry "cn=collective,cn=schema,cn=config"

SASL/EXTERNAL authentication started

SASL username: gidNumber=0+uidNumber=0,cn=peercred,cn=external,cn=auth

SASL SSF: 0

adding new entry "cn=corba,cn=schema,cn=config"

SASL/EXTERNAL authentication started

SASL username: gidNumber=0+uidNumber=0,cn=peercred,cn=external,cn=auth

SASL SSF: 0

adding new entry "cn=core,cn=schema,cn=config"

ldap_add: Other (e.g., implementation specific) error (80)

additional info: olcAttributeTypes: Duplicate attributeType: "2.5.4.2"

SASL/EXTERNAL authentication started

SASL username: gidNumber=0+uidNumber=0,cn=peercred,cn=external,cn=auth

SASL SSF: 0

adding new entry "cn=cosine,cn=schema,cn=config"

SASL/EXTERNAL authentication started

SASL username: gidNumber=0+uidNumber=0,cn=peercred,cn=external,cn=auth

SASL SSF: 0

adding new entry "cn=duaconf,cn=schema,cn=config"

SASL/EXTERNAL authentication started

SASL username: gidNumber=0+uidNumber=0,cn=peercred,cn=external,cn=auth

SASL SSF: 0

adding new entry "cn=dyngroup,cn=schema,cn=config"

SASL/EXTERNAL authentication started

SASL username: gidNumber=0+uidNumber=0,cn=peercred,cn=external,cn=auth

SASL SSF: 0

adding new entry "cn=inetorgperson,cn=schema,cn=config"

SASL/EXTERNAL authentication started

SASL username: gidNumber=0+uidNumber=0,cn=peercred,cn=external,cn=auth

SASL SSF: 0

adding new entry "cn=java,cn=schema,cn=config"

SASL/EXTERNAL authentication started

SASL username: gidNumber=0+uidNumber=0,cn=peercred,cn=external,cn=auth

SASL SSF: 0

adding new entry "cn=misc,cn=schema,cn=config"

SASL/EXTERNAL authentication started

SASL username: gidNumber=0+uidNumber=0,cn=peercred,cn=external,cn=auth

SASL SSF: 0

adding new entry "cn=nis,cn=schema,cn=config"

SASL/EXTERNAL authentication started

SASL username: gidNumber=0+uidNumber=0,cn=peercred,cn=external,cn=auth

SASL SSF: 0

adding new entry "cn=openldap,cn=schema,cn=config"

SASL/EXTERNAL authentication started

SASL username: gidNumber=0+uidNumber=0,cn=peercred,cn=external,cn=auth

SASL SSF: 0

adding new entry "cn=pmi,cn=schema,cn=config"

SASL/EXTERNAL authentication started

SASL username: gidNumber=0+uidNumber=0,cn=peercred,cn=external,cn=auth

SASL SSF: 0

adding new entry "cn=ppolicy,cn=schema,cn=config"
  • 配置basedn

    olcSuffix —— 数据库后缀,它是LDAP服务器提供信息的域名。简单来说,它应该更改为域名。
    olcRootDN —— 一般指的是root用户,具有所有访问权限的用户
    olcRootPW —— RootDN的密码

    olcLogLevel—— 日志的收集

1
2
3
4
5
6
7
8
9
10
11
12
13
14
15
16
17
18
19
20
21
22
23
24
25
26
27
28
29
30
31
32
33
34
35
36
37
38
39
dn: olcDatabase={1}monitor,cn=config

changetype: modify

replace: olcAccess

olcAccess: {0}to * by dn.base="gidNumber=0+uidNumber=0,cn=peercred,cn=external,cn=auth" read by dn.base="cn=admin,dc=sugon,dc=com" read by * none

dn: olcDatabase={2}hdb,cn=config

changetype: modify

replace: olcSuffix

olcSuffix: dc=sugon,dc=com

dn: olcDatabase={2}hdb,cn=config

changetype: modify

replace: olcRootDN

olcRootDN: cn=admin,dc=sugon,dc=com

dn: olcDatabase={2}hdb,cn=config

changetype: modify

add: olcRootPW

olcRootPW: {SSHA}nQm5h1Yyifuv8nnPxkop062/yKWCizrE

dn: cn=config

changetype: modify

add: olcLogLevel

olcLogLevel: stats
1
2
3
4
5
6
7
8
9
10
11
12
13
14
15
16
17
ldapmodify -Y EXTERNAL -H ldapi:/// -f base.ldif ###添加basedn

SASL/EXTERNAL authentication started

SASL username: gidNumber=0+uidNumber=0,cn=peercred,cn=external,cn=auth

SASL SSF: 0

modifying entry "olcDatabase={1}monitor,cn=config"

modifying entry "olcDatabase={2}hdb,cn=config"

modifying entry "olcDatabase={2}hdb,cn=config"

modifying entry "olcDatabase={2}hdb,cn=config"

modifying entry "cn=config"
  • 设置工作目录
1
2
3
4
5
6
7
8
9
10
11
12
13
14
15
16
17
18
19
20
21
22
23
24
25
26
27
28
29
30
31
32
33
dn: dc=sugon,dc=com

dc: sugon

objectClass: top

objectClass: domain

dn: cn=admin,dc=sugon,dc=com

cn: admin

objectClass: organizationalRole

description: LDAP Manager

dn: ou=People,dc=sugon,dc=com

objectClass: organizationalUnit

objectClass: top

ou: People

dn: ou=Group,dc=sugon,dc=com

objectClass: organizationalUnit

objectClass: top

ou: Group

ldapadd -x -D "cn=admin,dc=sugon,dc=com" -w 123456 -f init.ldif
  • 设置允许普通用户修改自己的密码
1
2
3
4
5
6
7
8
9
10
11
12
13
dn: olcDatabase={2}hdb,cn=config

changetype: modify

replace: olcAccess

olcAccess: {0}to attrs=userPassword,shadowLastChange by dn="cn=admin,dc=sugon,dc=com" write by anonymous auth by self write by * none

olcAccess: {1}to dn.base="" by read

olcAccess: {2}to by dn="cn=admin,dc=sugon,dc=com" write by * read

ldapadd -Q -Y EXTERNAL -H ldapi:/// -f anonymous.ldif
  • 设置memberof
1
2
3
4
5
6
7
8
9
10
11
12
13
14
15
16
17
18
19
20
21
22
23
24
25
26
27
28
29
30
31
32
33
34
35
dn: cn=module{0},cn=config

cn: module{0}

objectClass: olcModuleList

objectClass: top

olcModuleLoad: memberof

olcModulePath: /usr/lib64/openldap

dn: olcOverlay=memberof,olcDatabase={2}hdb,cn=config

objectClass: olcConfig

objectClass: olcMemberOf

objectClass: olcOverlayConfig

objectClass: top

olcOverlay: memberof

olcMemberOfDangling: ignore

olcMemberOfRefInt: TRUE

olcMemberOfGroupOC: groupOfUniqueNames

olcMemberOfMemberAD: uniqueMember

olcMemberOfMemberOfAD: memberOf

ldapadd -Q -Y EXTERNAL -H ldapi:/// -f memberof.ldif
  • ldap服务端性能调优
1
2
3
4
5
6
7
8
9
10
11
12
13
14
15
16
17
18
19
20
21
22
23
24
25
26
27
dn: cn=config

changetype: modify

replace: olcSizeLimit

olcSizeLimit: 100000

dn: cn=config

changetype: modify

replace: olcTimeLimit

olcTimeLimit: 300

ldapmodify -Q -Y EXTERNAL -H ldapi:/// -f update_ldap_conf.ldif

vim /etc/openldap/ldap.conf

#SIZELIMIT 12

SIZELIMIT 100000 //增加存储容量

#TIMELIMIT 15

TIMELIMIT 60 //延长时间限制
  • 增加查询索引,加快查询速度
1
2
3
4
5
6
7
8
9
dn: olcDatabase={2}hdb,cn=config

changetype: modify

add: olcDbIndex

olcDbIndex: uid eq

ldapmodify -Q -Y EXTERNAL -H ldapi:/// -f update_ldap_index.ldif
  • 增加数据库缓存容量,加速数据读写
1
2
3
4
5
6
7
8
9
10
11
12
13
14
15
16
17
18
19
20
21
22
23
24
25
26
27
28
29
30
31
dn: olcDatabase={2}hdb,cn=config

changetype: modify

replace: olcDbCachesize

olcDbCacheSize: 100000

dn: olcDatabase={2}hdb,cn=config

changetype: modify

replace: olcDbIDLcacheSize

olcDbIDLcacheSize: 300000

dn: olcDatabase={2}hdb,cn=config

changetype: modify

replace: olcDbConfig

olcDbConfig: set_cachesize 0 536870912 0

olcDbConfig: set_lg_bsize 2097512

olcDbConfig: set_lg_regionmax 10485760

olcDbConfig: set_lg_max 104857600

ldapmodify -Q -Y EXTERNAL -H ldapi:/// -f update_ldap_dbcache.ldif
  • 系统用户迁移工具
1
2
3
4
5
6
7
8
9
10
11
12
13
yum install migrationtools -y

# Default DNS domain

#$DEFAULT_MAIL_DOMAIN = "padl.com";

$DEFAULT_MAIL_DOMAIN = "sugon.com";

# Default base

#$DEFAULT_BASE = "dc=padl,dc=com";

$DEFAULT_BASE = "dc=sugon,dc=com";

1.3 openldap添加用户

  • 编写自定义用户ldif文件
1
2
3
4
5
6
7
8
9
10
11
12
13
14
15
16
17
18
19
20
21
22
23
24
25
26
27
28
29
30
31
dn: uid=yaolang,ou=People,dc=sugon,dc=com

uid: yaolang //OpenLDAP的uid信息

userPassword: 111111

cn: yaolang

objectClass: account

objectClass: posixAccount

objectClass: top

objectClass: shadowAccount

loginShell: /bin/bash //用户登陆的SHELL

uidNumber: 3000 //账号的UID

gidNumber: 3001 //账号的GID

homeDirectory: /public/home/yaolang //用户主目录指定

shadowLastChange: 18208

shadowMin: 0 //密码将允许修改的天数(0代表任何时间都可以修改)

shadowMax: 99999 //系统强制用户修改为新密码的天数

shadowWarning: 7 //密码过7天进行报告
  • 编写自定义用户组信息
1
2
3
4
5
6
7
8
9
dn: cn=yaol,ou=Group,dc=sugon,dc=com

objectClass: posixGroup

objectClass: top

cn: yaol

gidNumber: 3001 //和前面用户的gidNumber对应

1.4 LDAP客户端安装配置

1.4.1 客户端安装
1
yum -y install openldap-clients nscd authconfig nss-pam-ldapd
1.4.2 客户端配置
  • 客户端注册到LDAP服务端上,10.0.50.100是LDAP服务端的IP地址
1
2
3
4
5
6
7
8
9
10
11
12
13
14
15
16
17
18
19
20
21
22
23
authconfig --enablesssd \

--enablemkhomedir \

--enablesssdauth \

--enablecachecreds \

--enableldap \

--enableldapauth \

--disableforcelegacy \

--disableldaptls \

--disablekrb5 \

--ldapserver=10.0.50.100 \

--ldapbasedn=”dc=sugon,dc=com” \

--update
1.4.3 验证客户端正确性
1
2
3
4
5
6
7
getent passwd yaolang

yaolang:x:3000:3001:yaolang:/public/home/yaolang:/bin/bash

getent passwd yaolang2

yaolang2:*:3002:3003:yaolang2:/public/home/yaolang2:/bin/bash
  • 登录进行验证

verfify-id

verfify-passwd

  • 可以使用ldap密码进行认证
1.4.4 客户端用户密码验证
  • 配置可以用密码进行验证
1
2
3
4
5
6
7
8
9
10
11
12
13
14
15
16
17
sed -i 's/^auth[[:space:]]*substack[[:space:]]*password-auth/#&/' /etc/pam.d/sshd

sed -i 's/^auth[[:space:]]*include[[:space:]]*postlogin/#&/' /etc/pam.d/sshd

# add config

sed -i '/session[[:space:]]*include[[:space:]]*postlogin/a\session required pam_mkhomedir.so' /etc/pam.d/sshd

sed -i '/auth[[:space:]]*required[[:space:]]*pam_sepermit.so/a\password include password-auth' /etc/pam.d/sshd

sed -i '/auth[[:space:]]*required[[:space:]]*pam_sepermit.so/a\account include password-auth' /etc/pam.d/sshd

sed -i '/auth[[:space:]]*required[[:space:]]*pam_sepermit.so/a\account required pam_nologin.so' /etc/pam.d/sshd

sed -i '/auth[[:space:]]*required[[:space:]]*pam_sepermit.so/a\auth include password-auth' /etc/pam.d/sshd

authconfig --enablemkhomedir --disableldaptls --disablekrb5 --ldapserver "$LDAP_MASTER_NODE" --ldapbasedn "$LDAP_DOMAIN" –update
  • 设置在ldap中查找用户名和利用ldap密码认证
1
2
3
4
5
6
7
8
9
  sed -i "s/sss/ldap/g" /etc/nsswitch.conf

sed -i "s/ldap\s*ldap/ldap/g" /etc/nsswitch.conf

sed -i "s/pam_sss.so/pam_ldap.so/g" /etc/pam.d/password-auth

sed -i "s/pam_sss.so/pam_ldap.so/g" /etc/pam.d/system-auth

systemctl restart sshd nslcd
1.4.5 ldap相关客户端优化
1
2
3
4
5
6
7
8
9
10
11
12
13
14
15
16
17
18
19
20
21
22
23
24
25
26
27
28
29
30
31
32
33
34
35
36
37
38
39
40
41
42
43
44
45
46
47
NSLCD_THREADS=3

NSLCD_IDLE_TIMELIMIT=60

NSLCD_TIMELIMIT=30

sed -i '/^threads/d' /etc/nslcd.conf

sed -i '/^idle_timelimit/d' /etc/nslcd.conf

sed -i '/^timelimit/d' /etc/nslcd.conf

sed -i '/^nss_initgroups_ignoreusers/d' /etc/nslcd.conf

echo "threads $NSLCD_THREADS" >> /etc/nslcd.conf

echo "idle_timelimit $NSLCD_IDLE_TIMELIMIT" >> /etc/nslcd.conf

echo "timelimit $NSLCD_TIMELIMIT" >> /etc/nslcd.conf

echo 'nss_initgroups_ignoreusers ALLLOCAL' >> /etc/nslcd.conf

systemctl restart nslcd

systemctl enable nslcd

sed -i '/positive-time-to-live\tpasswd/c\\tpositive-time-to-live\tpasswd\t\t604800' /etc/nscd.conf

sed -i '/positive-time-to-live\tgroup/c\\tpositive-time-to-live\tgroup\t\t604800' /etc/nscd.conf

sed -i '/enable-cache\t\thosts/s#yes#no#' /etc/nscd.conf

sed -i '/enable-cache\t\tservices/s#yes#no#' /etc/nscd.conf

sed -i '/enable-cache\t\tnetgroup/s#yes#no#' /etc/nscd.conf

systemctl restart nscd

systemctl enable nscd

sed -i '/^SIZELIMIT/d' /etc/openldap/ldap.conf

sed -i '/^TIMELIMIT/d' /etc/openldap/ldap.conf

echo "SIZELIMIT 100000" >> /etc/openldap/ldap.conf

echo "TIMELIMIT 60" >> /etc/openldap/ldap.conf

sssd

需要保证/etc/sssd/sssd.conf的内容正确性,否则会无法获取到用户信息

  • OPENLDAP
  • Centos7.6

扫一扫,分享到微信

微信分享二维码
SLURM调度软件的安装与配置
思科路由器学习专题1_路由基础命令
© 2021 Yao L
YaoL Blog by Yao L
  • 所有文章
  • 推荐
  • 关于我

tag:

  • CAE
  • benchmark
  • OPENLDAP
  • Centos7.6
  • LSF
  • Linux
  • PAC
  • Arch
  • Config
  • Tools
  • 网络虚拟化
  • SLURM
  • Munge
  • vps
  • shadowsocks
  • iptables
  • nat
  • centos
  • FileSystem
  • kvm
  • network
  • bridge
  • lustre
  • mds
  • mgt
  • ost
  • netdata
  • influxdb
  • grafana
  • Abaqus
  • torque
  • maui
  • scheduler
  • xcat
  • Murderp2p
  • pxe
  • ESXI
  • IB
  • Virtual
  • PXE
  • DHCP
  • kickstart
  • infiniband
  • OPA
  • Cisco
  • CLI
  • perf
  • linux
  • Lustre
  • architecture
  • 2d torus
  • 3d torus
  • Fat-Tree
  • 全线速
  • 阻塞

    缺失模块。
    1、请确保node版本大于6.2
    2、在博客根目录(注意不是yilia根目录)执行以下命令:
    npm i hexo-generator-json-content --save

    3、在根目录_config.yml里添加配置:

      jsonContent:
        meta: false
        pages: false
        posts:
          title: true
          date: true
          path: true
          text: false
          raw: false
          content: false
          slug: false
          updated: false
          comments: false
          link: false
          permalink: false
          excerpt: false
          categories: false
          tags: true
    

  • 英特尔产品大全
  • 华科开源镜像
  • 朱双印博客
  • 谷歌
  • Shadowsocks分享
硕士毕业于华中科技大学

目前主要从事高性能计算的工作

谢谢大家